Sunday, 15 August 2010

Day 16 - Sunday

The final day !! tomorrow I'm back to work so today really needed to go well, luckily it did.

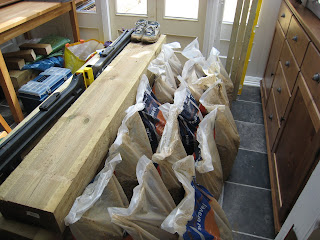
First job was to go and purchase the extra pea gravel needed to fill the frame before laying the deck. I went for an additional 15 bags of gravel which took two trips to collect as I didn't want to break the car.

Here they are ready to go:


With all the gravel in place the frame is ready for decking, it's a shame I'll never see the frame again I have grown quite fond of it, and with the decking boards down you will never see the engineering which went into it, oh well..


After 15 days of really f''king back breaking hard graft it was time to finally lay the decking boards.


With all the decking boards screwed in tight there was nothing left but to sweep up, luckily I had a little help.


Obviously there is still some work to do, the side sleeper arrangement needs finalising and fixing, the back bed needs turning over and then there is all the planting. The main thing is the deck is finished, thank f$&k. With such a small garden it was difficult to know what best to do with it, many ideas were discussed but we always came back to this one although it seemed almost impossible to achieve. I'm so glad we stuck with the hardest but ultimately the best option.

I have vowed not to touch anything DIY related for at least the next two weeks, but I'll probably break it come the weekend...

So the end result after 16 days of toil is arms like hams, a sore back, empty wallet and this, and I for one couldn't be happier. See you.


And let's remeber how it used to look just a month ago..

Saturday, 14 August 2010

Day 15 - Saturday

Superb progress today. First up, legs ! Here are the eight legs cut and bolted to the frame sat nicely in their holes with a cut through the anti-weed fabric for access.


I love a little steel on wood..


The full deck frame with legs bolted and concreted in and a few bolsters between the crossbeams.


And now to lay the pea gravel, I optimistically bought eight bags but that's not going to cut it, by my rough calculations I'll need another 18 bags at £5.09 a pop, so off to the DIY store tomorrow for £100 ! worth of gravel I'll never ever see again..


 NEED MORE PEA GRAVEL...

So a quick word on the costs for this project, in a very rough calculation I think this whole thing will have set me back approx £1500, bear in mind £340 of that was for the two skips. Is it too much ? I don't think so really. Given the difficulties of digging out the entire back garden with no direct access and the inventive ways I've needed to employ to get round problems caused by the lack of space I can imagine any 'professionals' would  have taken me to town for about 3k, so actually I'm £1500 up... No didn't convince me either.

Saying that I've also blown 2 weeks annual leave on getting this done but then who would make a better job than me ?, what I mean is who would care as much to get things just right, certainly not somebody simply looking for a cheque at the end of the job. I've also had a huge amount of fun with the project, don't get me wrong it's been fraking hard and almost a spiritual journey of sorts but to start from nothing and achieve all this single handed make me very pleased.

I've never tackled a project this big before and for a first timer I think I've done all right.

Tomorrow - decking boards !!!!!!!!!!!!!!!!!!!!!!!!!!!!!!!!!!!!!!!!!!!!!!!!!!!!!!!!

Friday, 13 August 2010

Day 14 - Friday

So first job of the day was to figure out why the deck frame was longer than the deck boards. Turns out the 360 cm long joists I purchased to form the sides of the frame are actually 362 cm long, nice one nation wide DIY firm, it certainly does have your name on it, written all over it in fact.

It is so typical of the shoddy quality of merchandise you get from DIY chains these days, wood in particular. You really have to check that every single piece isn't bent like a banana, split or has huge chunks knocked out of it.

So after hiking the frame up onto the sleeper wall I removed the end crossbeam, took 2cm of each side of the frame and re-drilled and screwed the crossbeam. With everything now the correct length I was ready for the next job.

While the deck frame sits level on the ground and will be suitably heavy once all the deck boards are attached I want to be really sure that it never moves. So the frame will be secured by bolts at eight points to 75 x 75 fence posts which will be sunk into the ground and concreted in place. So I needed to dig the eight holes, bearing in mind that I'm already at 2.5 feet below the original ground level you can imagine how compacted the earth is and how difficult it was to carve out eight 1.5 foot holes from it, finally 2-3 hours later and I was done.

Last job for the day was to lay the anti-weed fabric under the decking frame.

So the final position for the day was this:


Tomorrow; bolts, legs, pea gravel and maybe, just maybe even some deck laying..

Day 13 - Thursday

The weather was not great today but the rain did hold off for the most part. Today was 'deck frame day', finally after all the days of prep I was at the stage where I could start to actually build something.

With the support platform in place from the day before I was ready to go. The plan was to fix all the crossbeams for the left side first. This all went fairly smoothly, much more so than any task in this project so far.


With the left side complete it was time to prop it up, bring all the decking boards and sleepers inside and then raise the right side of the frame for fixing. Obviously this wasn't very easy but let's skip over that.

With both sides fixed and all cross beams in place I laid down the frame flat, this is the first time I've really been able to see how big the deck will actually be.


I laid out a couple of decking boards only to find that the deck frame is approx 2cm longer than the decking boards ! bollocks, I'd obviously screwed up somewhere but I'll need to figure that out tomorrow.

Day 12 - Wednesday

So the sun came out today - hurrah ! The major task for the day was to fix and bolt together the back wall of sleepers, known as 'The Beast', it comprises four sleepers and forms the retaining barrier for the back bed. With the sleepers overlapping the idea is to use 4 x 75x75 fence posts bolted to the back of the beast so that each post covers two sleepers and each sleeper is fixed to two posts, the posts will be bolted in from behind to keep the front clean using coach bolts. The posts will extend into holes in the ground so that once fixed they can be concreted in.

As I have limited access from behind (oo'er) when the beast is vertical the plan is to lay it down bolt together and then rotate it to vertical dropping the posts nicely into the holes.

Here is the beast laying on its front for marking up the posts and drill holes.


Lets skip over the frustrating 2.5 hours it took to dig the four post holes..

The drilling all went well and with the posts bolted in place and a few extra batons for strength I was ready to rotate ! 

Here is the beast in place, with all posts sitting comfortably in their holes.


With that done there wasn't much of the day left. I thought I'd get a head start for the next morning by moving everything around ready to construct the deck frame.

Space is very limited in my little garden, so limited in fact that with the deck area maximised there is not enough free on each side to be able to use a drill or screw driver. The answer was to construct each side of the decking at a raised angle, about chest height. This gave me the access I needed to work with the drill.

I used the sleepers and decking boards to build a solid platform to work on.


Here is the very first cross beam ready for fixing.

Tuesday, 10 August 2010

Day 11 - Tuesday PM

So it rained all f'king day and now at 19:00 the sun comes out ! bloody marvellous, thanks JC.

Anyway, I got the cut sleepers laid out. Once fixed in place they should look something like this:


You can see why I need a few more sleepers, and also the mud bath I have to work in. I also got about half of the pilot holes drilled for the decking frame. I'm now running about half a day behind and really need to make this up tomorrow.

Day 11 - Tuesday AM

Right then Jesus, time for you and I to have a heart to heart my cloth wearing friend..

I have a modest number of days annual leave allocated by my masters each year and I try to use them wisely, normally a weeks family holiday and then the required days for Christmas, after that I tend to use them to achieve various home improvement projects to better the life of my family, and the value of our property (which is negative by the way, thanks Gordon you twat !).

So I'm into the second week of annual leave to turn our garden from some 'Ground Farce' botch up into a space that is both pleasant, useful and safe for my son. And what do you do, strike at me at every turn, it's baking hot for the weeks I spend travelling 5 hours a day to the hell hole that is London, sweating it out on the tube of death and then as soon as I'm on leave.. you make it piss it down with rain all day today ! the garden now looks like a Glastonbury mud bath and every job is twice as hard to get done.

You may as well send round the four horsemen to help with the measuring up, ffs

Some say you were misunderstood, and some that history had to play out this way for a higher purpose. I tell you what though,  if I'd been there on 1st April 33 I'd have used more than 3 nails..

**RANT OVER** Until we clash swords again JC.

Observe the mud bath..


So all I've really achieved today is to move the decking boards inside (again), measure up for the width of the sleepers that form the back wall and cut them to length. Ideally I'd like to get them in today, and then drill the pilot holes for the decking frame although after measuring up it looks like there will be a fair bit of work to get the rear sleeper wall level. This is important as it will provide the guide to laying the side sleepers.


I'm also aware that after laying out the frame yesterday I may need to lower the ground level a little to get the correct depth, and I'm a little strapped for where to put the spoil as I really do not want to hire yet another skip.

Anyway, back into the breech..

Monday, 9 August 2010

Day 10 - Monday

Well then, here it is day 10, unfortunately it did not get off to the best start..

I went to a local DIY store to grab a couple of extra sleepers, despite having previously purchased 8 sleepers from the same store just 4 short weeks ago they no longer stock 'that' model of sleeper in store anymore, only one that is smaller shorter and is really more a bit of wood than a sleeper, ffs.

It took about 5 minutes to extract this information from the worlds most unhelpful and dense 'customer services operative' who seemed barely aware of what line of business his employer was in.. and for once the employee wasn't some young disaffected cool kid whose only care is texting on his mobile, his face book status and how best to score with the hot chick on Friday night round the back of the local church... No, the 'customer services operative' in question was some senile silver haired mutha fooker, part of the 'Free jobs at DIY stores for all retired idiots, no interview required' programme which is so popular these days.

Anyway with an hour of my life wasted I headed home to get stuck in. The first job was to finish shaping the right hand side to the required depth and get it vertical.


With that done I moved the decking boards inside to give me room to layout the outside edge of the frame with a sleeper on each side and measure up.


The decking frame will be 261 cm wide and 360 cm deep, this will make it 18 decking boards wide with a 5mm gap between each board for expansion.

With the measurements in hand I marked up and cut all 9 of the frame cross beams to length and laid them out in a rough fit.


The main issue with screwing the frame together will be the clearance or lack of on each side, this will make it very difficult to get in with the electric screwdriver and impossible for the drill so I will need to mark and pre-drill the pilot holes for the screws. I'll make that the first job for tomorrow.

Sunday, 8 August 2010

It's back on like Donkey kong..

Right, I've booked another weeks annual leave which begins tomorrow (9th August 2010) and I'm ready for decking action..

This is the last block of time I will spend working on the garden decking project so it has to be completley finished by Sunday 15th August.. no excuses, no nothing it must be done by then, for my sanity if nothing else.

Everything is prepared, the wood for the decking frame was delivered last week and I've loaded up with frame and decking screws from a local DIY store this weekend. I did think about starting this weekend but in the end something much more fun came up...

As I'm sure many people do we regularly visit ikea for this and that, most trips normally result in my son wanting to purchase just about everything child related in the store and being a little upset when we don't.

One of his favourite things is the Ikea childs play kitchen:


An impressive looking bit of kit however, what you are looking at is actually two items with a total cost of £96.00 !

Not wanting to deny our son or to outlay almost £100 we decided to build our own play kitchen by buying various bits'n'pieces and then slapping them together.

So with all the pieces to hand and my son and partner away for the weekend I spent Saturday afternoon and Sunday morning constructing this !!!


I am really very happy with the result and I had so much fun building it ! and the best is yet to come when I see the look on my sons face when he sees it :)

With that diversion aside here's looking forward to day 10 of the garden resurrection project..

Sunday, 18 July 2010

Day 9 - Sunday

Right, day 9 the final day of digging hell. The aim today was to finish excavating the nemesis. Save for 5 cm I made it, halle-fucking-lujah !

The right side is all but complete and the skip is full to overflowing, I still can't believe how much has come out of such a small area.

So close of play today is:

...

And skip number two is a little full...


So what's next ?, well unfortunately back to work for a bit until I can arrange another weeks annual leave. Then the fun really starts, installation of the sleepers building the frame and laying the deck boards. I have a sneaking feeling that I may need to level off the ground area a little so no doubt another skip will be needed.

And the last laugh... is on Google, whose street view and Google earth images of my house are ridiculously out of date ! up yours you mocha drinking, wireless data stealing, pointless OS creating, Apple wanna be  pricks..

Just to note that writing this post on Blogger (Owned by Google) using Chrome, Google is identified as an incorrect spelling with Goggle and Googly as the first two suggestions - muppets, ffs.

Saturday, 17 July 2010

Day 8 - Saturday (Again)

Bloody hell, eight days already.. I hardly noticed ;) This whole garden thing is starting to feel a bit too much like a job...


Anyway massive progress with the work today, the left side has been smoothed making the cut in vertical (just about, took hours), also I rolled out the sleepers to both check the depth is correct and to try to get an idea of what the end result might be, unfortunately I hadn't got it quite right and needed to take another half a foot out at the back, an hour later and I was in business.


I'm thinking I may need to add further sleepers down the sides as one length doesn't quite look right and adding another would give the illusion of a longer garden.

With the left side finished for now and the back at the right depth and vertical I needed to move the decking boards over to allow me to attack the right side, as I was moving them anyway I took the opportunity to lay out a few boards to check depth and get a sneak peek.


...

Obviously the height and spacing isn't quite correct, but you get the idea. With all the decking moved over to the left I'm now set up to lay into the right side of the nemesis tomorrow, just two days until I have to return to work so I'd better make it count.

 A few pics of how things stand at close of play on day eight.


...

Just for a change a view from the back of the garden.


...

Sitting at the back to take these pictures I realised how deep the bed will be on the right side, with the depth we will be able to plant multiple layers making the back of the garden a real focal point and giving a great view from the lounge or conservatory. Luckily I'm not be responsible for the planting as an expert it on hand...

Finally, it feels like the longest fraking eight days of my life ever however a quick look at how things were back then makes me feel a little better.


Friday, 16 July 2010

Day 7 - Friday

Dear God everything hurts so bad ! The endless pick, shovel and chugg work is really relentless on the muscles. The first round is the worst each day as all the pain comes flooding back as soon as I pick up the pick.

Fantastic progress today though, I faced off against the nemesis this morning and I have finally reached the back dig line, hurrah !


I tested the depth by laying out a few decking boards, it is difficult to see but I can almost imagine the finished result.


With the back line reached I cracked into digging out the left side. When finished the back and each side will be lined by sleepers with the deck sitting snug between and some heavy planting in the back bed to obscure the wall. The left side is now all but finished with just smoothing to get it vertical remaining.


..


Until very recently our neighbour had a huge hedge on the boundary of her garden right behind our fence, the hedge has now been removed and some god awful pebble gravel hell makeover inflicted on her garden by a bunch of cowboys who must have been on Watchdog or Rouge Traders at least once.. anyway it's all very good having your hedge chopped down to the stumps but that doesn't take care of the bastard roots which have spent years infiltrating your neighbours garden. Excavating the left side I seem to come across a root every other swing of the pick.

So far my collection looks like this, and that's just this afternoon:


The rule of aeration is one that will catch  you off guard if you every go Dizzie Rascal (bonkers) insane and decide it's a good idea to dig out your back garden, essentially the rule states that for each quantity of tightly compacted earth you remove the process of excavation aerates it and results in it taking up 1.5 x the space of the original compacted size, I can best demonstrate this with a picture of skip number two..


So it's looking like this 'little project' will take 2 weeks of annual leave, 3 skips and far too much money for my liking to complete, oh well.

Roll on day 8 - awesome.


Thursday, 15 July 2010

Day 6 - Thursday PM

Spoke too soon, big JC was mocking me. I got out back to face the nemesis, got 3 chuggs full and the heavens opened. Fuck it, I just carried on, even Jesus can't best me.

The hordes of rain have turned the whole excavation into a soggy bog which has just made everything really messy, shoveling  is particularly hard now that the dig out sticks together, on the plus side the rain has actually made it easier working with the pick.

Anyway despite the odds ranged against me I made fair progress, on the left side I've almost reached the magic distance. I should mark the back dig line in paint, that way the photos will easily show progress.

So final pic for the day:


PS - Annual leave for DIY project beard is really rocking now !